 Largest Stocks Online
 Low Online Prices
 Free Fitting Advice
 Free Delivery £100+
Fitting uPVC Cladding
Detailed Instructions for installing uPVC Cladding.
From handy hints and tips, to how far apart plastic head pins and nails should be fixed, this handy fitter friendly guide below is designed for trade professionals and DIY'ers alike. If you can't find the answers you are looking for, do not hesitate to pick up the phone and call the ‘Fascia Experts’ on 01254 918 005.
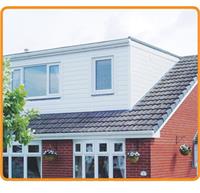
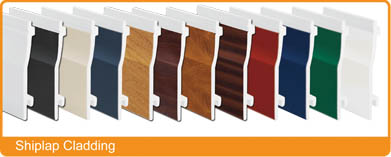
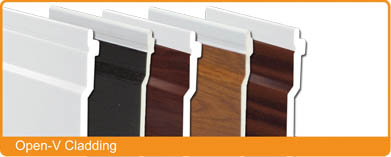
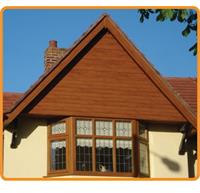 uPVC Shiplap Cladding is a fantastic and versatile product which can be used to replace old rotten timber cladding, or to simply to add a new dimension to any building. uPVC Cladding is a solid and rigid product that once installed provides a maintenance free uPVC cladding solution for up to 30 years. White Cladding is available in two distinctive styles - Shiplap Cladding 150mm and Open V Cladding 100mm. Both types of White uPVC Cladding can be installed either vertically, horizontally or diagonally.
Before you start installing the uPVC Cladding
Please follow the instructions below before you start installing your brand new uPVC Cladding.
- Firstly and most importantly, please ensure all Health & Safety guidelines are followed – we don’t want you having an accident whilst replacing your uPVC Cladding.
-
FasciaExpert.co.uk recommends that our uPVC cladding be installed over a timber stud frame or over a masonry or block substrate and should be fixed to a preserved treated timber batten.
-
Cladding fixing points should be no further apart than 600mm for White Cladding, and 400mm for Woodgrain or coloured Cladding.
- Installation begins by fixing trims (2 part U- Channel Cladding Trim G2UCW or Cladding U – Trim GUCW ) around the area of which you wish to clad, for 90 degree corners please use 2 Part External Corner Trim G2ECW.
- Shiplap Cladding is fixed using stainless steel cladding pins (GCP30) positioned along the grove (datum line) which runs the entire length of the uPVC cladding.
- Pinning the shiplap cladding should take place from the centre of the boards working outwards. Subsequent lengths are fitted over the preceding length ensuring the tongue and groove joint is located and the cladding pin heads are concealed by the overlap. Please also allow for 5mm expansion gaps at each end, either vertically or horizontally.
- FasciaExpert.co.uk Shiplap Cladding is supplied in 5m lengths, to join lengths please use either Shiplap Cladding 150mm Joint Covers GSJ150W or Cladding Centre Joint Trim GCJW.
Checklist for a Cladding Installation
Don’t get caught short, try and make sure you have everything you need before you start the replacement of the cladding. The checklist below should help you cover all bases.
- Cladding Board
- Cladding Starter Trims
- Cladding 90 Degree Angles
- Cladding External Corner Trim
- Cladding Endcaps
- Cladding Pins
- Predator uPVC Saw


FasciaExpert.co.uk, Partnership Way, Shadsworth Business Park, Blackburn, BB1 2QP. Reg No 02767596, Vat No 864 4661 00.