 Largest Stocks Online
 Low Online Prices
 Free Fitting Advice
 Free Delivery £100+
Fitting Continuous Dry Verge
Pre Installation Requirements for Continuous Dry Verge Type S (Slate)
- Ensure all Health & Safety guidelines are adhered to.
- Fascia Expert Continuous Dry Verge Type S is suitable for most applications and types of building, including domestic dwellings, commercial properties and industrial units.
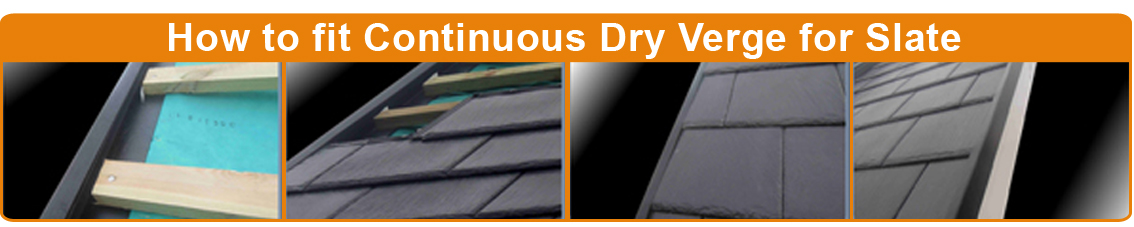
Installation Procedure for Continuous Dry Verge Type S (Slate)
- Roof battens to be fixed in place to the required slate gauge, however the batten ends are not fixed in place as yet to allow the 60mm flange of the slate verge to be fitted under the batten, which is the easiest way to fit in place.
- The roof battens ends are then securely fixed in place, by nailing through both batten and verge, into the timber rafter.
- The slate verge profile is then at an angle, which is manufactured in that way, so the top flange clamps down on any thickness of slate, from a 5/6mm general slate to 12/13mm natural slate.
- To open the external face of the slate verge, a temporary batten is placed between the batten courses, which is pushed against the inner face of the slate verge, and nailed in place. This opens the profile of the verge to a vertical position.
- The slates are fixed in place in the usual manner, with the outer edge of the slate fixed against the internal edge of the verge.
- This will hold the verge in the vertical position, and continue this procedure in the normal manner up the verge of the roof.
- Continuous Slate Dry Verge achieves a professional finish for any type of sale being used.
Pre Installation Requirements for Continuous Dry Verge Type D (Tiles)
- Ensure all Health & Safety guidelines are adhered to.
- Fascia Expert Continuous Dry Verge Type D is suitable for most applications and types of building, including domestic dwellings, commercial properties and industrial units.
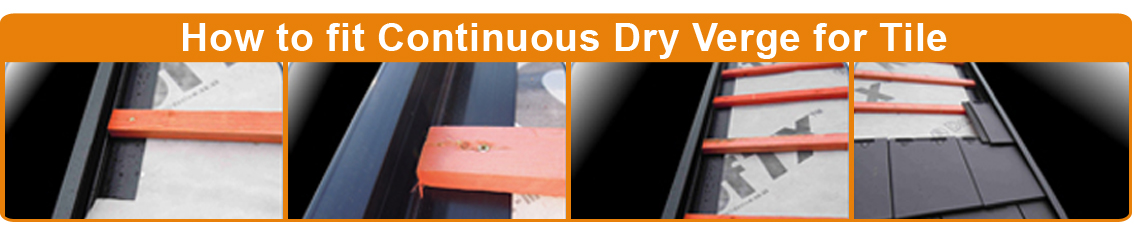
Installation Procedure for Continuous Dry Verge Type S (Slate)
- Fascia Experts Continuous Dry Verge should be cut to the required length allowing for a plumb cut at the ridge, and approximately 150mm longer than the rafter. The horizontal flange is cut away, to allowing fitting over the felt support tray at the eaves.
- The battens are placed against the lip of the water channel of the dry verge, which are the nailed into position directly through the horizontal fin of the Verge.
- The nails are fixed through both batten and verge, into the timber rafter.
- A close-up of the roof battens in place show their position against the lip of the drainage channel.
- Once all the battens are fixed place, and the Dry Verge secure, the roof is ready for tiling.
- The roof tiles are fitted in the usual manner, ensuring that the verge tiles are fully inserted into the continuous dry verge, where the top flange will hold them securely in place.
- At the eaves, the verge should be cut square, flush to the lower tile.
- The water channel allows any rainwater to run directly into the rainwater gutter.
- The fitted Continuous Dry Verge achieves a professional finish. This will be similar for any roof tile or slate being used.
- The completed roof gives complete continuous cover against water penetration, and added strength from wind damage by securing end tiles firmly.
For more information relating to Fascia Experts continuous dry verge system please call 01254 918 005.
Why not complete your Continuous Dry Verge installation with new Fascias and Soffits from Fascia Expert. Fascia Boards are used as bargeboards in all roofline installations.


ABOUT US
Connect with us


FasciaExpert.co.uk, Partnership Way, Shadsworth Business Park, Blackburn, BB1 2QP. Reg No 02767596, Vat No 864 4661 00.