 Largest Stocks Online
 Low Online Prices
 Free Fitting Advice
 Free Delivery £100+
Fitting Fascias & Soffits
From handy hints and tips, to how far apart plastic head pins and nails should be fixed, this handy fitter friendly guide below is designed for trade professionals and DIY'ers alike. If you can't find the answers you are looking for, do not hesitate to pick up the phone and call the ‘Fascia Experts’ on 01254 918 005.
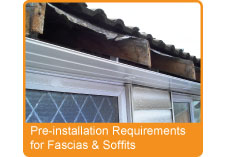
Before you start installing the uPVC Fascias & Soffits
Please follow the instructions below before you start installing your brand new fascias and soffits.

- Firstly and most importantly, please ensure all Health & Safety guidelines are followed – we don’t want you having an accident whilst replacing your fascias and soffits.
- Begin by removing all existing timber fascias and old gutters and downpipes to make way for a full roofline replacement of new maintenance free uPVC fascias and soffit boards. The timber fascias and plastic gutters removed are easily recycled at your local refuse centre – cut them into small sections so they are easily transferred if you are disposing yourself.
- Remove first 2 layers of roof tiles where necessary to allow for inspection of felt, with a view to replacement with new ventilation, eaves protection systems and breathable membrane. It’s extremely common for the existing felt to have deteriorated over the years meaning it will need replacing.
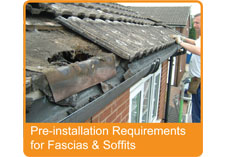
- Check rafters to ensure the timber is structurally sound and free from rot, as you don’t want to nail new uPVC fascias onto rotting timber rafters as they won’t be secured. Also check to ensure they are plumb and level. This will ensure the fascia board lines through with the roofline.
- Any rafters showing signs of rot should be cut out and replaced on refurbishment roofline projects.
- For those involved in new build projects, timber rafters must be located at a maximum of 600mm for all white fascias, and no more than 400mm for foiled fascias. Foils are spaced at shorter distances as they absorb more heat that White so need to be fixed more regularly. (Please note all our fascias and soffits and protected by Heat Shield technology meaning they won’t warp, twist or crack).
- Again, for those involved in new build projects, soffit bearers must be at a maximum of 600mm for all white soffits, and no more than 400mm for foiled profiles for the same reason as above.
- Suitable gable framing must be provided to securely fix Bargeboards.
Installation Procedure for Fascias & Soffits
Ok, so you’re now ready to start the installation of your brand new maintenance free uPVC fascias and soffits. Please follow the instructions below to ensure your uPVC roofline lasts in excess of 30 years.
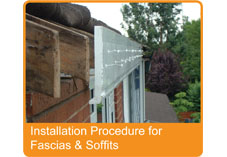
- To get started, install a pre-measured length of uPVC soffit board using 40mm A4 Marine grade stainless steel plastic headed pins. (Tip! generally plastic headed pins – 25mm to 40mm - are used for soffits and cap over fascias, and plastic headed nails – 50mm and above - are used for full replacement fascias).
- The uPVC soffits should be fixed at 600mm centres for White, and 400mm for Woodgrains and Colours.
- To join soffits use soffit joint trim (GSJTW) and leave a minimum of 10mm expansion gap between joints. The soffit joint strip is 5m long and is easy cut with a hack saw to match the width of your soffit.

- The front of the soffit will be hidden by the fascia boards return leg, and the rear will either sit on top of the brick work, or will need nailing into a timber battern – this depends on the construction of your house.
- Select the appropriate height and profile of fascia board and fix using 2 x 65mm A4 Marine grade stainless steel plastic headed nails. (Tip! FasciaExpert.co.uk only supply Homeline Building Products fascias and soffits as they have an innovative and clever way of ensuring your fixing points are evenly spaced - depending on colour - and perfectly level. The fascia board is supplied with a superb low tact tape which both protects the fascias and provides a guide of where to install your plastic headed nails).
- When using over fascia ventilation please allow for this in the overall height (approx 30mm)
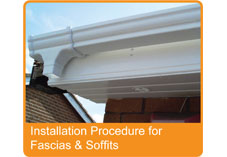
- Fix fascias at a minimum of 600mm centres for white fascias, and 400mm for foiled fascias.
- To join please select the appropriate fascia joints depending on your profile, and leave a minimum of 10mm expansion gap between joints.
- Joints can be secured using superglue to just one side of the fascia – otherwise they will detach after time. You can also pin the joint using a matching plastic head pin for extra piece of mind. (Tip! If using superglue then use a superglue activator spray for an instant grab).
- To finish a corner profile, please select the appropriate fascia corner detail. This could be a either an external 90 degree corner or a 135 degree corner which are common above bay windows. We also supply internal corners.
- Our fascia corners that are 300mm high are single ended, whereas our double ended fascia corners are 500mm. The double ended fascia corners are easily cut to make 2 x 250mm corners.
- To fix use low modulus neutral cure silicone, or super glue to one side in the same way as fascia joints. By only fixing on one side, this allows for movement for expansion and contraction in different climates.
- Install ventilation directly to the top of the fascia board if required maintaining air path to comply with building regulations.
- There are several different types of ventilation depending on your needs. A simple over fascia ventilator provides the necessary ventilation, but we also sell over fascia ventilators that act as eave protection systems too.
- Install rainwater system, fixing brackets directly into fascia board using 25mm stainless steel screws. (Tip! We have a dedicated section for the fitting of floplast gutters and downpipes).
Checklist for a Fascia and Soffit Installation
Don’t get caught short, try and make sure you have everything you need before you start the replacement of new build or refurbishment roofline job. The checklist below should help you cover all bases.
- Fascias board
- Fascia joints & corners
- Soffit board
- Soffit joints
- Ventilation
- Plastic headed pins & nails


FasciaExpert.co.uk, Partnership Way, Shadsworth Business Park, Blackburn, BB1 2QP. Reg No 02767596, Vat No 864 4661 00.